Mixing Your Own Soil Using The KIS Nutrient Pack
DISCLAIMER:
This is a detailed walkthrough created by one of our clients for small and indoor garden enthusiasts. While we cannot take responsibility for the results of following the methods contained within this document, we think it's an excellent guide for new growers mixing their own soil.
More from KIS Organics:
This does seem to us to be the most thorough mix guide we’ve seen for small home gardens. The concepts and methods are solid and following these instructions should result in a thriving organic living soil (OLS) that can be used for most crops.
INTRODUCTION:
Recently I’ve become aware of a trend in home gardening and small organic farming towards mixing organic living soil (OLS) to create a soil food web (SFW) Link. It allows a farmer or home gardener to use nature to feed their plants and prevent pests. It is the cleanest, most Earth-friendly farming method on the planet. This document is not about the details of an SFW, it’s about creating one. I encourage you to read and learn about the ecosystem of your living soil. It will change everything you thought you knew about gardening and hopefully help you make the leap to building your very own SFW.
CHALLENGES:
I settled on the KIS Organics Nutrient Pack based on friend’s recommendations and the customer service I received when I called them to ask questions. I ultimately realized how little I actually knew about mixing and cooking OLS. KIS Organics provides a good guideline for people who are already familiar with creating and maintaining an SFW, but not for someone like me who had no idea where to start. The more I searched the internet for instructions, the more misinformation and conflicting methodology I found. I did what any gardener does; I played it by ear and did the best I could. I learned some great lessons and I’m sharing them with you in the instructions below.
While trying to source, mix, and cook my soil, I ran into a few issues that I was able to overcome. Here’s what I learned:
- Mixing 60 gallons of soil (a double-sized batch) takes a lot of room (16’x8’).
- Mixing 60 gallons of soil with a rake and shovel takes considerable time and effort.
- Cooking soil in an airtight container will cause it to go anaerobic and it will stink bad, really bad! Also, most crops will not grow in anaerobic soil.
- There are a lot of bag compost products, but “not” very many good ones.
- Earthworm castings are one of Nature’s great miracles when it comes to mixing your own OLS and brewing AACT teas.
SOLUTION:
Through trial and error, I found an easy method that works for me. I’ve documented my method and I encourage you to try it and improve on it. It’s really easy as long as you have space, time, and energy.
The steps and pictures below will walk you through the process I use to mix and cook my own OLS. I will break down the steps of the KIS Organics suggested recipe and give a detailed explanation of how I do that step. Use what you have available and make your own compost/castings whenever possible.
Note: This recipe is great for a few outdoor containers, but KIS Organics does have their soil mixes available in 1.5 cu ft bags or in yard quantities.
KIS Tip: A lot of our customers use the following recipe for larger quantities. This recipe will make a ½ yard of OLS.
- 1x - 3.8 cu ft compressed bale of Alaskan Peat Moss
- 1x - 4 cu ft bag medium size perlite
- 2x – 1 cu ft Oly Mountain Compost
- 3x – Regular KIS Nutrient Packs
KIS Organics Recipe from the Nutrient Pack Label:
“WATER ONLY SOIL RECIPE: (This makes a little over 30 gallons or 4 cubic ft of soil)
15 gallons sphagnum peat moss
10 gallons aeration amendment (pumice, perlite, lava rock, etc...)
5 gallons high-quality compost or earthworm castings (very important for proper nutrient cycling)
Add one Regular KIS Nutrient Pack and mix thoroughly and then water to field capacity. Turn the soil the following day then every other day for 7-14 days. When the soil has cooled to ambient temperature it is ready to plant in. It’s easiest to mix on a slab, tarp, or kiddie pool as not to lose any ingredients when adding water.”
Here Are The Instructions:
Suggested Tools:
- 12’ x 10’ heavy-duty tarp (it will take some abuse)
- Duct Tape
- Heavy Objects
- Garden rake with a flat back edge
- Flat Blade Shovel
- 5-gallon bucket
- Dust mask or respirator (I use a silicone mask with HEPA filters)
- Hose or watering can
For 30 Gallons of Soil (double the ingredients for a 60-gallon batch):
- Put on your respirator
- Mix all your dry ingredients prior to adding your compost and/or organic earthworm castings.
- Spread a heavy-duty tarp on the floor of your garage and open the doors (it will get dusty). You can use heavy objects to help keep it in place while mixing. You may want to incorporate the tarp as a tool (If you’re strong enough) to roll the soil in conjunction with raking. It speeds up the process (this is easier before adding much water).
- 15 Gallons of Loose Sphagnum Peat Moss.
- The recipe calls for 15 gallons of sphagnum peat moss. What you need to know is that most peat moss comes compressed. If you buy a 1 cu ft compressed bale of peat moss, it’s usually a lot more than 1 cu ft. The brand I use expands to a little less than 2x the volume of the original bale. I use Alaskan brand. KIS tip: “A 3.8 cu ft bale of peat moss expands to 6 cubic feet.”
- Work your bale of peat moss until it’s completely uncompressed. It’s best to break it up really well with your hands. This will ensure you get all the clumps out.
- Use a 5-gallon bucket to measure out 15 gallons of peat moss and spread it out on your tarp.
- Add 10 gallons aeration amendment (pumice, perlite, lava rock, etc...)
- The recipe calls for 10 gallons of aeration amendment and gives many options. What’s important to realize is that some of the ingredients listed hold moisture and others simply help with aeration. If you’re going to use rice hulls or vermiculite, be sure to use those sparingly. Perlite is the main ingredient (we’re looking for aeration). 90% Perlite is the number to shoot for here.
- I use 10 gallons of Perlite because it’s easily sourced and inexpensive. Don’t use anything that has amendments added to it. Make sure you CHECK THE LABEL! I use the large size Perlite because I like my soil to dry out a little quicker (2 – 5 days), but most container growers use medium size. KIS tip: “In the KIS Water Only Super Soil, we use 1/3 large pumice and 2/3 medium pumice.”
- Use a 5-gallon bucket to measure out 10 gallons of Perlite (or combination of Perlite and other aeration ingredients) and spread it out on top of your peat moss.
- Add the Regular KIS Nutrient Pack and Water
- Spread the Regular KIS Nutrient Pack evenly over the rest of the dry ingredients. Use a watering can to limit the dust factor but don’t use much. It will weigh it down and make it harder to work.
- 5 Gallons of High-Quality Compost or Earthworm Castings.
- The recipe calls for “high-quality compost”. What is high-quality compost and how do I know the compost I find will work for my plants? Check out the KIS tip below for tips on compost and organic earthworm castings. Red Wriggler Earthworms (eisenia fetida) are easily sourced, inexpensive, and considered to be one of the best worms for worm bins (indoors or out).
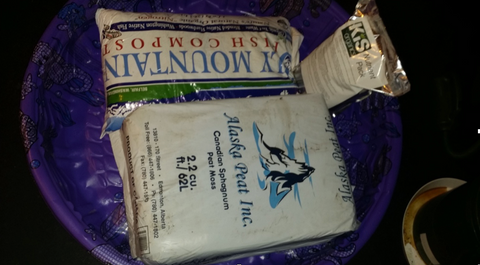
Here is a picture of some ingredients I’ve had great success using – This kiddie pool is a little too small to mix a batch of soil in. That’s why I use a tarp.

KIS Tip: “This is tricky because many people don’t know how to compost properly and aren’t making good thermal compost. If not properly composted, you could be bringing in various weed seeds (that you do not want in your garden) or even diseases. I typically only recommend using homemade earthworm castings because the worms will take care of composting the material for you, but even then it won’t remove weed seeds or disease issues. For example, most “flower” material in the Pacific NW will get botrytis in the fall, meaning any old buds or flowers that you threw into your outdoor compost bin will most likely harbor this pathogen and it’s not something you want to be putting back into your indoor environment.”
- I use the Oly Mountain Fish Compost and mix it with locally sourced earthworm castings.
- Use a 5-gallon bucket to measure out 5 gallons of compost or organic earthworm castings and spread it out on top of your dry mixed ingredients.
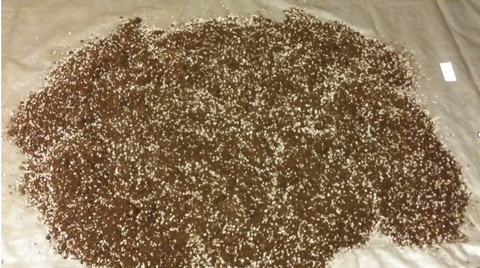
Here’s a picture of the dry ingredients mixed and ready for compost and/or organic earthworm castings.

Add Water and Mix to Field Capacity
- Start mixing it together and add water as you go. I use 6-8 gallons of water (total) for 30 gallons of soil. Use enough water to get it to “field capacity”. Check out the KIS tip below for an explanation of field capacity.
KIS Tip: “Take a handful of soil and squeeze it firmly, if only a drop or two of water comes out, the soil is at field capacity.” If you have a moisture meter, aim for 80-120 mbar.
It takes me about an hour to wet and mix it thoroughly.

Cook Your Soil for 10 – 14 days
Here are some tips to help you cook your soil correctly and start growing your favorite crops.
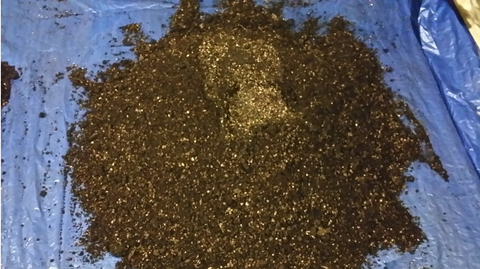
- In order for your mixture to become OLS, it needs to cook. The most optimum way to cook your soil is pictured above. Make a tall pile to speed up the cooking process.
- Turn your soil every other day. “Turning your soil” means moving the soil from the bottom of the pile to the top of the pile while simultaneously moving the soil from the bottom of the pile to the top of the pile. The purpose is to redistribute moisture and ensure the soil is getting enough air for the microbes to thrive. Just use your shovel and rake. It takes me about 20 minutes. Use the tarp method to turn your soil if possible.
- Keep the moisture level similar to how you would if it had a plant in it. This is very important. Check daily for moisture content (80-120 mbar) and adjust accordingly.
- The warmer the environment the faster the cooking process will be. I always keep my environment between 60 and 80 F when possible. At this temperature, I need to add approximately between 0.5 to 1 gallons of water daily to keep the soil at optimal soil moisture.
- Depending on the air temps and the size of your pile, as the soil heats up it can get quite hot. Don’t allow the soil to get above 160 F, as this will kill some of the beneficial organisms. Above 131F will kill off any pathogens or weed seeds that may have come in with your compost or worm castings. As a general rule, if you reach into the middle of the pile and it’s uncomfortably warm, then it should be turned or mixed.
Here’s Some KIS Tips:
- Treat the soil as if there was a plant growing in it.
- We recommend a minimum of 7-gallon containers for maximum benefit on a full cycle plant. Larger is better. 20-gallon pots are ideal.
From the Author: I’ve found 10-gallon fabric pots are the best for me.
- Water frequently to keep soil evenly moist, for best results keep soil near “field capacity”.
- When using a moisture meter aim for 80-120 mbar.
- For every 16 sq.ft. of growing area, use 30-90 gallons of soil –
From the Author: “I’ve found 60 gallons per 16 sq.ft. optimum.”
- For the best results use Tropf Blumat automatic irrigation.
- If you wish to add additional nutrients, please refer to the rest of our product line or use other nutrients at ¼ of the recommended application rate - (optional).
- If the soil sits for 48 hours without heating up above ambient temperature it is ready to plant in.
From the Author: “If using the (container) method below let it cook for 30+ days.”
Alternative soil cooking method:
There are many reasons why a person would not want to have a garage full of soil for 2+ weeks. I figured out a way to cook my soil without taking up the whole garage floor. It’s clean but it takes a little longer to cook your soil. With that said, these DIY containers are awesome and I use them to cook all my soil now.
What you’ll need:
- 1 – 35 Gallon Heavy-Duty tote. I use 37-gallon Rubbermaid totes. Those are the ones used in the pictures below
- 1 – Drill and a 3/8” drill bit.
- 1 – Sharp knife.
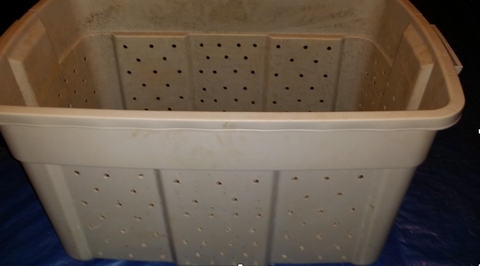
I drilled a bunch of holes in the tote. I made sure not to drill holes in the corners or wedges, staying away from anything but a flat surface (places that bear weight should be avoided). I opted not to drill any holes in the bottom. I didn't want any moisture to bleed through. To drill the holes I used a 3/8” inch drill bit.

There was quite a bit of material sticking out of the holes I drilled so I took my pocket knife and quickly knocked those off (a sharp knife is the key here).

Here is the tote after I cleaned the 3/9” holes with my knife.

Fill the tote with soil and leave it uncovered. Check the temp and moisture level daily. If the soil sits for 48 hours without heating up above ambient temperature it is ready to plant in. Approximately 30 days for the tote method. From here, all you “have” to do is add water.


